Now that fermentation has ended and you have fined, back sweetened or adjusted the flavor, the hard cider is ready to be bottled. There are many container options when it comes to bottling cider but here are a few things to think about before filling them up and sealing the cap.
The main considerations are as follows:
Will you be aging the cider longer than a year?
Do you prefer carbonated or still cider?
Aging Hard Cider:
Most ciders will benefit from some aging depending on the style. Sweet ciders with a relatively low ABV may clear out and mellow after a month while some higher ABV dry ciders will benefit from several months to a year of aging similar to wines.
The easiest way to age a cider is to bulk age in a vessel such as a glass carboy or barrel. This allows greater quality control of the whole batch and ensures almost all of the yeast drops out before the cider is bottled.
If you plan to age your cider for more than a few months in bottles, most bottles will work great. But if you plan for long term storage, consider bottling it with a cork closure as corks provide the best some of the best oxygen protection.
Carbonated Cider:
To carbonated cider in the bottle, a small amount of sugar, called priming sugar, needs to be added to the cider right before bottling. The yeast will feed on this new sugar and produce more CO2, but because the bottle is capped, the CO2 is forced into the cider and it becomes carbonated.
While one ounce of sugar per gallon is a general rule, priming calculators are very handy and should be used if you are going to be bottle carbonating.
If all of this makes you nervous, maybe give kegging a try. Read this article about the basics of kegging cider.
Still Cider:
If you prefer a still or non-sparkling cider, add a dose of Campden and sulfites to your finished cider to make sure future fermentation will be inhibited. Allow the stabilized cider to sit for at least 24 hours before bottling.
Because still ciders will not create any additional pressure, it can be bottled in wine bottles with a cork or in capped bottles. Try to limit headspace to no more than an inch to minimize the amount of oxygen exposure in the bottle.
How to Prime Hard Cider for Carbonation:
Step One: Measure priming sugar calculated per gallon of cider and dissolve the sugar in a small amount of boiling water. Measure the sugar carefully as too much sugar will cause the bottles to explode! Use a digital scale or carbonation drops to ensure accuracy.
Step Two: Pour the sugar solution into a brew kettle or bottling bucket.
Step Three: Siphon the hard cider into the brew kettle or bottling bucket. Try not to splash or shake the cider, you do not want to add oxygen to the cider at this point. If needed, gently stir the cider with a spoon or racking cane.
Step Four: Complete bottling

Types Of Bottles For Cider:
If you prefer a still cider, any bottle will work great. However, a carbonated cider requires a cap that will be able to contain the pressure.
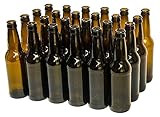
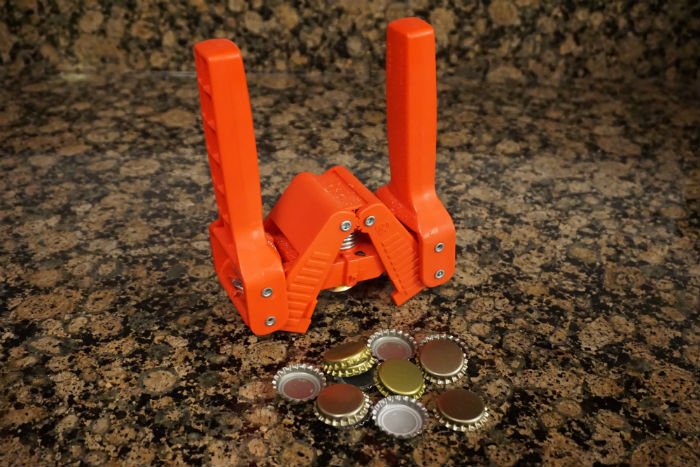
Beer Bottle with a crown cap:
Any standard non-screw off beer bottle can be used as long as it is free of defects and has been properly cleaned and sanitized. New metal crown caps can be purchased from any brewing shop or online homebrewing store. These caps will also require a capping device to crimp the metal caps onto the bottles. The metal caps have a plastic ring on the inside that forms a tight seal on the bottle.
Growlers with a screw cap:
Growlers are my personal favorite because I generally don’t pour just one pint of cider. Bottling hard cider in half-gallon growlers also means fewer bottles are required, which means less work!
While growlers can be purchased at a brewing supply store, I collected mine from microbreweries and the occasional thrift store find. Most growler bottles use a 38mm screw cap that comes in both reusable and single use. Also, these screw top bottles do not require any additional capping devices!
Swing Top Bottles:
Swing top bottles, also known as Grolsch style, are a vintage bottle that most commonly comes in a 16oz or 1 liter size. The simple swing top cap design is self-sealing and does not require a capping device! Swing top bottles also add a touch of style to your homemade hard cider and are great for first time cider makers.
These bottles are great for short term storage but the rubber seals may not last for long-term aging especially if they have been washed and reused multiple times. Inspect and replace the seals on swing top bottles as needed. While sanitizing swing top bottles, it is best to remove the rubber seal to make sure no hidden bacteria or mold is hiding anywhere.
Wine Bottle with a cork:
Wine bottles are only suitable for still cider because the carbonation would push the cork right out of the bottle. Not only will this be a mess, but a major loss of delicious cider.
Any standard wine bottle can be used as long as it is free of defects and has been properly cleaned and sanitized. New corks are cheap but you will need to buy a corking machine to get them pushed into the bottle.
How to Bottle Hard Cider:
Step One: Sanitize all equipment, bottles, and caps that will be used for the bottling process.
Step Two: Use a siphon to rack the cider into a brew kettle or bottling bucket. Take care to not transfer the sediment at the bottom of the fermenter.
Step Three: Complete any additions such as Campden & sulfites depending on the style of cider you are making.
Step Four: Use a siphon and bottle filler attachment or a bottling bucket to fill sanitized bottles. Try to limit headspace to no more than an inch to minimize the amount of oxygen in the bottle.
Step Five: Cap, cork or flip the swing top on your bottle to finish the bottling process.
Storage:
The bottles of cider should be stored out of sunlight in a cool place until they are ready to be cooled and enjoyed.
If the cider has been primed for carbonation, the yeast will need at least two weeks to complete the carbonation process.